How to Use a Mirror to Fix Your Form (Without Wrecking It)
Last reviewed by Nick Smoot, NASM-CPT, Founder of Smoot Fitness
Who this is for: People training without a coach, a spotter, or a training partner to catch their mistakes like home gym lifters, beginners still learning what “good form” even feels like, and anyone who’s ever caught their own reflection mid-set and thought, wait, is that normal?
Quick summary
- Mirrors work by giving you real-time visual feedback your body can’t always sense on its own but the timing of that feedback matters more than most gym-goers realize.
- For some lifts (squats, presses, rows) a mirror is genuinely useful. For others (heavy deadlifts) it can actively pull your form apart.
- The fix isn’t “use mirrors” or “avoid mirrors” it’s knowing which cue to check, on which lift, and when to look away.
- A short self-audit protocol (below) replaces vague mirror-gazing with five specific checkpoints you can actually act on mid-set.
You’re three reps into a set of squats, and something feels off. You glance up at the mirror to check and by the time your brain processes what you saw, you’re already coming out of the hole. That half-second delay is the whole story of mirror training, and almost nobody talks about it.
Here’s the part that surprised me the first time I read into this: a 2019 systematic review published in BMJ Open Sport & Exercise Medicine looked at the actual research on mirror training and motor performance in healthy adults, and the effects were far more mixed than the “mirrors = better form” advice you’ll find on most fitness blogs suggests. Mirror training as a technique actually started life in 1995 as a therapy for phantom-limb pain, long before it became a gym staple, and its expansion into general motor performance is more recent and less settled than most fitness content lets on. Separately, researchers writing in Frontiers in Bioengineering and Biotechnology have modeled how different lifting styles load the lumbar spine, and the mechanics get complicated fast which is exactly why a quick mirror glance can’t always catch what’s actually going wrong in your spine or joints during a lift. So no, this isn’t as simple as “stand in front of a mirror and watch yourself.” Used correctly, a mirror is one of the most useful free tools in your gym. Used the way most people use it, it can teach you to compensate for problems instead of fixing them.
This guide walks through exactly how to use a mirror to fix your form using lift by lift plus the situations where you should look away entirely, because that part matters just as much.
Why Mirrors Work (When They Work)
Your body’s internal sense of where it is in space, proprioception isn’t as reliable as you’d think, especially under load or fatigue. When you’re grinding through the last rep of a set, your brain is juggling breathing, bracing, and force output all at once. Fine-grained awareness of exactly where your knees or shoulder blades are sitting often loses that fight.
A mirror closes that gap by adding a visual channel. Instead of relying purely on internal feedback, you get an external check: are my knees actually where I think they are? Research on cross-education and mirror-based rehabilitation has proposed that watching a movement even your own engages neural pathways connected to the brain’s motor system, which is part of why mirror-based feedback has been studied not just in gyms but in stroke and injury rehabilitation. Researchers in this area have theorized that mirror-reflected visual input over an active limb can help strengthen connections within the cortical regions involved in movement control.
That’s the upside. The downside is timing. Visual processing isn’t instant by the time you register a fault in the mirror, you’re often already past the point in the movement where a correction would help. That single fact is the difference between mirror training that improves your lifts and mirror training that just gives you something to stare at.
How to Use a Mirror to Fix Your Squat Form
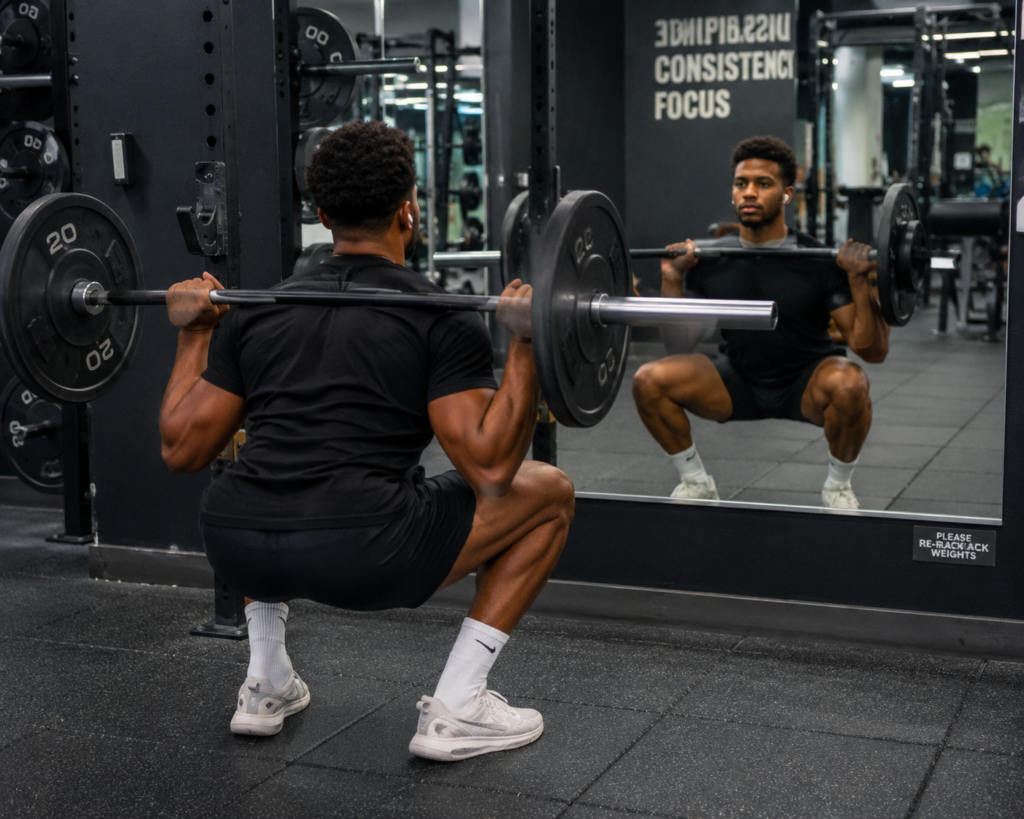
The squat is where mirrors earn their keep, mostly because the fault points are visible in a single frontal or side view and there’s enough time under tension to actually react.
What to check, and when:
- Descent: Watch your knees track in line with your toes, not caving inward. This is easiest to catch in the first third of the descent, before you’re deep enough that correction gets hard.
- Depth: A side-angle mirror is more useful here than a front-facing one, it lets you gauge hip crease relative to knee height without guessing.
- Ascent: This is where most people lose the mirror’s usefulness, because they’re focused on grinding the weight up, not watching themselves. That’s fine. Save the mirror check for the first half of the rep, not the whole thing.
One underrated cue: pick a single checkpoint per set instead of trying to watch your whole body at once. “Are my knees tracking over my toes” is a far more useful mirror cue mid-set than a general glance at your overall silhouette, and it keeps your eyes from wandering into other faults (like tilting your head, which throws off your balance more than most lifters realize).
Should You Use a Mirror When Deadlifting? (Probably Not, Here’s Why)
Deadlift form depends heavily on keeping a neutral spine by avoiding excessive lumbar flexion under load. Spine biomechanics researcher Dr. Stuart McGill has spent decades studying this exact mechanism, and his general position echoed across the biomechanics literature is that repeated loading of a flexed lumbar spine, especially under compression, is a primary driver of disc fatigue and lower back injury over time. A 2004 study measuring spinal stability and lumbar compression across common training exercises reinforced just how much technique changes the load your spine actually absorbs, the researchers ranked a range of common exercises by the stability and lumbar compression they produced, specifically to help guide safer exercise selection in practice.
Here’s where the mirror becomes a problem instead of a help: to see yourself in a mirror during a deadlift, you have to look up and slightly forward. That head position pulls your neck out of a neutral line with your spine and because your body tends to follow where your eyes point, looking up and to the side during a heavy pull can subtly rotate or extend your upper back exactly when you need it locked in place. By the time you’ve registered what you saw in the mirror, the rep is already moving, and the “correction” you make is often just an overcorrection that costs you more than it fixes.
The practical fix: for deadlifts specifically, ditch the live mirror check. Instead:
- Pick a fixed point on the floor about six feet in front of you and keep your eyes there through the whole pull.
- Film your working sets from the side instead, a phone propped against a plate does the job. Review between sets, not during them.
- If you train somewhere with wall-to-wall mirrors and can’t avoid them, angle your setup so the mirror is beside or behind you, not directly in your line of sight.
This isn’t a total ban on mirrors near your deadlift setup, it’s about recognizing that live visual feedback works differently depending on how much time the movement gives you to actually use it.
How to Use a Mirror to Fix Your Overhead Press
The overhead press rewards a front-facing mirror more than almost any other lift, mainly because the fault points like the elbow flare, bar path, and lean-back are all visible from directly in front of you, and the movement is slow enough to actually react mid-rep.
What to check, and when:
- Elbow path: As you press, your elbows should track slightly forward of your ears, not flare straight out to the sides. A front mirror shows this clearly in the first half of the press.
- Bar path: Watch for the bar drifting forward away from your body instead of traveling in a relatively straight vertical line. This is one of the easiest faults to both see and correct live, since the drift usually happens gradually across a rep rather than all at once.
- Lean-back: This is the one to actually watch for. Some lifters unconsciously arch and lean back to “make room” for the bar to clear their face, which shifts load onto the lower back. If you notice yourself leaning back specifically to get a better look at the bar in the mirror, that’s a sign the mirror is causing the fault rather than catching it which is a small step back from the mirror, or angling it slightly, usually fixes this.
Unlike the deadlift, there’s no strong argument against checking your press form live. The lift is slower, the visual feedback loop has time to actually influence the rep, and the injury risk from a mistimed glance is much lower.
How to Use a Mirror to Fix Your Bent-Over Row
Rows are the exercise where lifters most often reach for the wrong mirror angle. A front-facing mirror shows almost nothing useful here and you can’t judge hip hinge angle or spinal position from the front. You need a side view.
What to check, and when:
- Hip hinge angle: Set up next to a side-angle mirror (or angle a standing mirror at roughly 45 degrees) and check your torso angle before your first working rep. A torso that’s too upright turns the row into more of a shrug; too horizontal puts unnecessary strain on the lower back over high volume.
- Back flatness: This is the fault a front mirror will never catch. Rounding through the upper or lower back during a row is a side-view-only problem, and it’s one of the more common technique breakdowns as rows get heavy or the set drags into the last few reps.
- Elbow path: Whether you’re rowing for lats (elbows tucked closer to the body) or upper back (elbows flared wider), a side or three-quarter mirror angle lets you confirm you’re actually hitting the path you’re training for, rather than defaulting to whatever feels easiest under fatigue.
Because rows don’t carry the same neck-position risk that deadlifts do, checking your setup in a side mirror before each working set is a low-risk, genuinely useful habit and just don’t rely on a front-facing mirror and assume it’s telling you the whole story.
Comparison: Which Lifts Benefit From Mirror Feedback
| Exercise | Mirror Angle | Best Use | Watch-Out |
|---|---|---|---|
| Squat | Front or 45° side | Knee tracking, depth | Don’t stare through the whole rep — check early in the descent |
| Deadlift | Avoid direct sightline | Setup position only, before the pull | Looking up mid-pull can pull your spine out of neutral |
| Overhead Press | Front-facing | Elbow path, bar path straightness | Watching too closely can cause you to lean back to “see” the bar |
| Bent-Over Row | Side angle | Hip hinge angle, back flatness | Front mirrors won’t show spinal rounding — side view only |
| Barre / Bodyweight Flow | Front-facing | Alignment, tempo control | Low injury risk, mirrors are genuinely well-suited here |
The Part No One Tells You: Mirror Training for Solo Lifters Without a Coach
Most articles about form and mirrors assume you’ve got a trainer walking you through things, or at least a training partner who can spot obvious mistakes. If you’re lifting alone which describes a huge share of home gym owners and early-morning gym-goers, a mirror isn’t a “nice extra.” It’s often the only feedback loop you’ve got, which raises the stakes on using it correctly.
If that’s you, here’s the adjustment: build a pre-set checklist instead of trying to self-correct live. Before you unrack the bar, run through your two or three known fault points (say, “knees” and “chest up” for squats) and check them once in the mirror during your warm-up reps at lighter weight, where the pace is slow enough to actually process what you’re seeing. Then, for your working sets, trust the pattern you rehearsed rather than trying to watch and lift at the same time. This single change which is moving your mirror-checking to warm-up sets instead of working sets solves most of the timing-delay problem described earlier, without asking you to give up the tool entirely.
For lifters on a tight budget who can’t access a real-time coach or a phone tripod setup, this costs nothing beyond attention. It’s arguably the single highest-leverage free adjustment available to a solo lifter.
The Mental Side of Mirror Training Nobody Mentions
There’s a version of this conversation that almost every fitness article skips entirely: for a lot of people, standing in front of a gym mirror isn’t a neutral technical exercise. It’s uncomfortable. Maybe you’re newer to lifting and feel like everyone’s watching. Maybe you’ve got a complicated relationship with your reflection that has nothing to do with squat depth. That discomfort is common enough that it’s worth naming directly instead of pretending the mirror is purely a technical tool with no emotional weight attached.
If that’s part of your experience, a few adjustments make mirror training more usable without forcing you to just push through discomfort:
- Train at off-peak hours if a crowded, mirror-lined room adds pressure on top of the form-checking itself. Early morning or late evening sessions tend to be quieter and less exposed.
- Use a smaller, angled mirror instead of a full wall. A single mirror positioned specifically at your squat rack or bench does the technical job without putting your whole reflection on constant display.
- Separate “checking a joint angle” from “looking at yourself.” The goal of a mirror form-check is narrow and specific like the knee position, bar path, hip angle. It’s not a general self-assessment, and treating it that way can turn a useful technical tool into something that just adds stress to your session.
- Home gym setups sidestep this entirely. If mirror discomfort is a real barrier for you, a single mirror in a private home gym space gives you all the technical benefit above with none of the social exposure which is worth considering if that’s within reach.
None of this changes the mechanics covered above. It just means the “right” amount of mirror use isn’t purely a biomechanics question, it’s also about what keeps you consistent enough to actually train.
Common Mirror Training Mistakes
- Watching your whole body instead of one checkpoint. Trying to monitor everything at once means you catch nothing well.
- Using mirrors for every exercise the same way. As the comparison table above shows, a technique that helps your squat can hurt your deadlift.
- Correcting mid-rep instead of between reps or sets. Given the visual-processing delay, corrections made mid-movement are often too late to help and can throw off your balance.
- Ignoring gym mirror etiquette. Blocking someone else’s view, hovering directly in front of a mirror during a busy hour, or “coaching” strangers based on what you see in their reflection are all avoidable friction points, leave form corrections to people who’ve asked for them.
- Never using a mirror at all out of fear of the deadlift issue above. The deadlift caveat doesn’t mean mirrors are bad, it means match the tool to the lift.
A Simple 5-Step Mirror Form-Check Protocol
Use this at the start of any session where you’re training without a coach:
- Warm-up set, light weight: Perform 5–6 reps of your first lift facing a mirror. Pick one fault point only (e.g., knee tracking).
- Between-set review: After the warm-up set, take 15–20 seconds to mentally note what you saw, don’t try to fix it live.
- Working sets: For squats, presses, and rows keep the mirror in peripheral view, checking only in the first portion of the rep. For deadlifts, remove the mirror from your direct sightline entirely.
- Every third session, film instead of mirror: Prop a phone at a 45-degree angle and record one working set per lift. Review it later, side by side with how the rep felt.
- Log one adjustment per week, not five: Trying to fix everything the mirror shows you at once usually backfires. Pick your single biggest fault, fix it, then move to the next.
What Results to Actually Expect
Mirror training isn’t going to transform your lifts overnight, and anyone promising that is overselling it. Realistically:
- Weeks 1–2: You’ll get better at spotting your fault points, but your body may not yet respond fast enough to correct them mid-set. That’s normal because it’s a motor learning curve, not a failure.
- Weeks 3–6: Corrections start happening semi-automatically, especially for lifts where you’ve been using the between-set review method consistently.
- Beyond 6 weeks: For most lifters, the mirror becomes less necessary for the lifts you’ve cleaned up and you’ll start feeling faults before you see them, which is really the whole point. The mirror is a training wheel, not a permanent crutch.
If you’re still fighting the same fault after 6–8 weeks of consistent, focused mirror checks, that’s usually a sign of an underlying mobility or strength limitation rather than a form-awareness problem worth a look from a coach or physical therapist rather than more mirror time.
Where This Fits Into Your Broader Training
Form work doesn’t happen in isolation, it’s easiest to actually apply these mirror checkpoints when your training split gives you room to slow down on technique days rather than always chasing intensity. If you’re building out a home strength routine from scratch, our guide to home strength training walks through how to structure sessions so technique work doesn’t get squeezed out by the push for more weight.
Your Next Step
Pick one lift. Pick one fault point. Run the 5-step protocol above for your next two sessions before adding load. That’s it, not five simultaneous fixes, just one, done consistently, with the mirror actually working for you instead of against you.
FAQ
Is using a mirror bad for your deadlift? It can be, if you’re looking directly at it mid-pull. Turning your head up to check your reflection during a heavy deadlift can pull your neck and upper back out of a neutral line, which is the opposite of what you want under load. Check your setup position in the mirror before you pull, then look at a fixed point on the floor instead.
Why do gyms have mirrors everywhere? Beyond motivation and making the space feel bigger, mirrors give lifters real-time visual feedback on alignment and movement which is something that’s especially useful for exercises like squats, presses, and barre-style movements where faults are visible from a single angle.
Does looking in the mirror ruin your squat form? Not usually, squats give you enough time under tension for a mirror check early in the descent to actually help. The risk is trying to watch your entire body for the whole rep instead of picking one checkpoint.
How do I know if my form is wrong without a coach? Build a short checklist of one or two fault points per lift, check them during light warm-up sets in a mirror, and film your working sets periodically to review between sessions. If a fault doesn’t improve after several weeks of focused correction, it’s worth getting an in-person check from a trainer or physical therapist.
Is filming yourself better than using a mirror for form checks? For lifts like the deadlift, yes filming removes the need to look up mid-rep and gives you a full, reviewable record instead of a split-second glance. For squats and presses, mirrors and video both work well; video just adds the ability to slow things down afterward.
Do professional lifters use mirrors to train? Some do, selectively is often for accessory and technique work rather than heavy competition lifts, where coaches or filmed video tend to take over for form checks.
Sources Cited
- Chen Y, Wang P, Bai Y, Wang Y. Effects of mirror training on motor performance in healthy individuals: a systematic review and meta-analysis. BMJ Open Sport & Exercise Medicine. 2019. https://pmc.ncbi.nlm.nih.gov/articles/PMC6937065
- Mirror training to augment cross-education during resistance training: a hypothesis. PMC. https://pmc.ncbi.nlm.nih.gov/articles/PMC3721498/
- Kavcic N, Grenier S, McGill SM. Quantifying tissue loads and spine stability while performing commonly prescribed low back stabilization exercises. Spine. 2004. https://pubmed.ncbi.nlm.nih.gov/15480148/
- von Arx M, et al. From Stoop to Squat: A Comprehensive Analysis of Lumbar Loading Among Different Lifting Styles. Frontiers in Bioengineering and Biotechnology. 2021. https://www.ncbi.nlm.nih.gov/pmc/articles/PMC8599159/
- Thoracolumbar and Lumbopelvic Spinal Alignment During the Barbell Back Squat: A Comparison Between Men and Women. PMC. https://pmc.ncbi.nlm.nih.gov/articles/PMC10399085/

Nick Smoot is a certified fitness coach and the founder of Smoot Fitness, established in 2012. With over a decade of hands-on experience, Nick has personally coached more than 400 clients both in person and online helping them achieve lasting, life-changing physical transformations.
As a contributing expert at Sportiemade (sportiemade.com), Nick brings real-world expertise and a no-nonsense approach to fitness. His coaching philosophy goes beyond short-term results: he equips every client with the knowledge, habits, and mindset needed to get into the best shape of their life and stay there permanently.
Nick specialises in strength training, endurance performance, and the mental discipline that ties them together. His signature philosophy? Lift heavy, run far, and never stop learning.
Whether you are just beginning your fitness journey or looking to break through a plateau, Nick's evidence-based methods and proven track record make him one of the most trusted voices in the fitness space.