The Beginner’s Guide to Resistance Band Training: Build Real Strength at Home
Picture this: you’ve cleared a 2-metre square of floor space in your living room, you own a single resistance band that’s been sitting in a drawer since January, and you genuinely don’t know whether you’re supposed to stand on it, loop it around your knees, or anchor it to the door. You’re not confused because you’re unfit but confused because almost nobody explains how to actually start.
This is the gap every beginner falls into. Most articles assume you already know your mini loop from your power band, and that you’ve been training for years with dumbbells and just fancy a cheaper alternative. If that’s not you, this guide is for you. What follows is a complete beginner’s guide to resistance band training, how the kit works, how to use it safely, how to build a real routine around it, and how to keep making progress once you’ve found your rhythm.
Why Resistance Bands Are One of the Best Starting Points for Home Training
The science here is more robust than most people expect. A 2019 systematic review and meta-analysis published in SAGE Open Medicine (Lopes et al.) compared elastic resistance training against conventional resistance training using weight machines and dumbbells. The findings showed no statistically significant difference in muscular strength gains for both upper and lower limbs. Bands and weights, when effort and volume are matched, produce comparable results.
That’s not a workaround. That’s a genuine alternative backed by data. The 2026 American College of Sports Medicine (ACSM) Position Stand on resistance training for the first major update in 17 years, drawing on 137 systematic reviews and more than 30,000 participants which explicitly confirmed that elastic bands, bodyweight exercise, and home-based routines produce “marked benefits in strength, hypertrophy, and physical function.” The ACSM’s lead author, Dr. Stuart Phillips of McMaster University, put it plainly: “The best resistance training program is the one you’ll actually stick with.”
For most adults training at home, that means bands win on every practical dimension. They cost less than a single gym session per month, fit in a shoulder bag, and ask nothing of your joint health when you’re still learning how your body moves under load.
Understanding Your Kit: What the Different Bands Actually Do
You don’t need to own every type of resistance band. But knowing what each one does stops you from buying the wrong thing twice.
Resistance Band Types at a Glance
| Band Type | What It Looks Like | Best For | Beginner Pick? |
| Loop band (power band) | Flat, wide rubber loop, 1–2 meters long | Full-body compound moves, pull-assists, squats, rows | Yes — most versatile |
| Mini loop band | Small, flat loop (30–40 cm) | Glute activation, lateral walks, clamshells, warm-ups | Yes — buy a set of 3 |
| Tube band with handles | Tube with a handle at each end | Bicep curls, shoulder press, chest press | Yes — beginner-friendly grip |
| Therapy band (flat sheet) | Flat, wide, no loop | Rehab, mobility work, gentle resistance | Yes — if recovering from injury |
| Figure-8 band | Short, figure-8 shaped | Ankle work, targeted arm isolation | Not essential to start |
If you’re buying for the first time, a set of three mini loop bands (light, medium, heavy) and one long loop band will cover 90% of the exercises in this guide. Tube bands with handles are a comfortable addition if you prefer a grip that feels more like holding a dumbbell.
Choosing the Right Resistance Level
Bands are color-coded, but the coding isn’t universal but a “medium” yellow band from one brand might be a “light” from another. Use this as your guide instead: pick a resistance level where you can complete 10–12 reps with clean form, but where the last 2–3 reps feel genuinely effortful. If you finish 12 reps and feel like you could do 20 more, go up a level.
General Resistance Level Guide for Beginners
| Level | Common Colors | Who It Suits | Approx. Resistance |
|---|---|---|---|
| Extra light | Yellow, tan | Rehab, elderly beginners, post-injury | 2–6 kg |
| Light | Red, pink | Most complete beginners, warm-up sets | 6–10 kg |
| Medium | Green | Beginners with some activity base, upper body work | 10–15 kg |
| Heavy | Blue | Lower body exercises, intermediate level | 15–25 kg |
| Extra heavy | Black, silver | Advanced training, large compound movements | 25 kg+ |
Start lighter than you think you need to. Learning proper movement patterns on a light band is worth far more than straining through poor form on a heavy one.
How to Use Resistance Bands: The Core Exercises for Beginners
These six moves form the foundation of any effective beginner resistance band workout. They target every major muscle group, require no anchor point (except where noted), and can be done in under 30 minutes.
1. Banded Squat
Muscles worked: Quads, glutes, hamstrings
Place a mini loop band just above your knees. Stand with feet shoulder-width apart. Push your knees gently outward against the band throughout the movement, this activates the glutes and teaches correct knee tracking. Lower until your thighs are parallel to the floor (or as close as comfortable), then drive through your heels to stand.
Start with: 3 sets × 10–12 reps. Rest 60 seconds between sets.
Quick tip: If your knees cave inward as you rise, the band is doing its job by highlighting it. Keep pressing out consciously, that cue alone will build glute strength faster than most people expect.
2. Glute Bridge with Band
Muscles worked: Glutes, hamstrings, core
Lie on your back with knees bent and a mini loop band above your knees. Press your feet flat into the floor. Drive your hips upward until your body forms a straight line from shoulders to knees. Squeeze at the top for two seconds, then lower slowly. The band should stay taut throughout.
Start with: 3 sets × 12–15 reps.
Quick tip: Don’t rush the lowering phase. The slow descent (eccentric phase) is where a lot of the strength adaptation happens which most beginners throw away half their results by dropping back down too fast.
3. Seated Row
Muscles worked: Upper back (rhomboids, traps), biceps, rear deltoids
Sit on the floor with legs extended. Loop a long resistance band around both feet. Hold one end in each hand, palms facing each other. Keeping your back upright and core engaged, pull both hands toward your lower ribs and imagine squeezing a pencil between your shoulder blades. Control the return for 2–3 seconds.
Start with: 3 sets × 10–12 reps.
Quick tip: If your lower back is rounding, it means the band is too heavy or your hamstrings are pulling your pelvis. Bend your knees slightly, it takes the hamstrings out of the equation and lets your back do the work it’s supposed to.
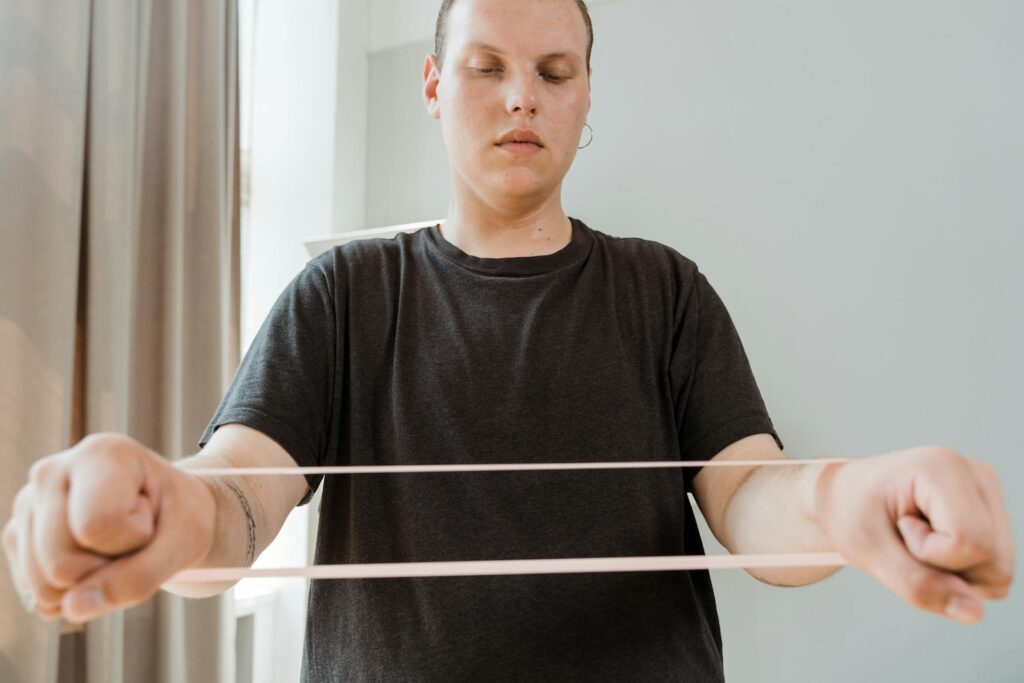
4. Band Pull-Apart
Muscles worked: Rear deltoids, rhomboids, upper traps
Hold a long loop band or tube band at chest height, hands shoulder-width apart. Keep your elbows straight and pull the band apart until your arms are fully extended to each side, squeezing your shoulder blades together at the end range. Return slowly.
Start with: 3 sets × 12–15 reps.
Quick tip: This is one of the most underrated exercises for people who sit at a desk all day. The muscles it targets are the rear deltoids and rhomboids which are chronically underworked in sedentary adults and directly counteract the rounded-shoulder posture that desk work creates.
5. Banded Bicep Curl
Muscles worked: Biceps, forearms
Stand on the center of a long loop band or tube band, feet hip-width apart. Hold one end in each hand with palms facing upward. Keeping your elbows pinned to your sides, curl both hands toward your shoulders. Lower slowly over 3 seconds.
Start with: 3 sets × 10–12 reps.
6. Standing Hip Abduction
Muscles worked: Glute medius, outer hip
Place a mini loop band just above your ankles. Stand with feet together, holding a wall or chair for balance. Keeping one leg straight, lift the other leg out to the side as far as your hip allows to go roughly 30–45 degrees. Hold for one second at the top, then lower with control. Complete all reps on one side before switching.
Start with: 2 sets × 12 reps per side.
Quick tip: This move is particularly valuable for older adults. Research published in the European Journal of Ageing (Yeun, 2017) found elastic resistance exercises improved both flexibility and balance in community-dwelling older adults and two of the key factors in fall prevention.
The Mistake That Keeps Most Beginners Stuck
If you’ve ever started strong and quit after two weeks, that’s not a willpower problem. It’s a structure problem and the structure problem usually comes from one specific mistake: using the same band, at the same tension, for the same number of reps, every single session.
Your body adapts to stress. If the stress doesn’t change, the adaptation stops. This principle which is the progressive overload is the single most important concept in strength training, and it’s where most beginner guidance quietly fails you. Articles tell you to “do the exercises” but skip the part about how to make them harder over time.
With bands, progressive overload works differently than with weights. You can’t just add 2.5 kg plates. Instead, you have four levers to pull:
How to Progress with Resistance Bands
| Method | How It Works | When to Use It |
| Shorten the band | Stand further from the anchor or wrap the band around your hand to reduce slack | First progression to try — easy to do mid-session |
| Add more reps | Increase from 10 to 15 reps per set | When current reps feel easy for 2 sessions in a row |
| Add more sets | Move from 2 sets to 3 sets, or 3 to 4 | Before moving to a heavier band which is a good intermediate step |
| Upgrade resistance level | Move to the next band (e.g. light → medium) | When all other methods are exhausted for that exercise |
The 2026 ACSM guidelines confirmed that the size of the jump doesn’t matter much, what matters is that the challenge increases consistently. Moving from 12 reps to 14 reps counts. Squeezing the band tighter to reduce slack counts. Small, regular steps compound into significant results over 8–12 weeks.
What a Real Training Week Looks Like
Training twice a week is a well-supported minimum for strength and hypertrophy gains, according to the ACSM’s 2026 Position Stand. Three sessions per week is optimal for most beginners. Here’s how that might look across a week when you’re working from home:
Sample 3-Day Beginner Resistance Band Weekly Plan
| Day | Focus | Exercises | Duration |
| Monday | Full body A | Banded squat, seated row, bicep curl, band pull-apart | 25–30 min |
| Tuesday | Rest or gentle walk | _ | |
| Wednesday | Full body B | Glute bridge, standing hip abduction, shoulder press, pallof press | 25–30 min |
| Thursday | Rest or mobility | _ | |
| Friday | Full body A (with progression) | Same as Monday — add 2 reps or shorten band | 25–30 min |
| Saturday & Sunday | Rest or light activity | _ |
Twenty-five to thirty minutes is a realistic session length when you’re starting out. Anything longer is unnecessary and often leads to the kind of over-enthusiasm that burns out by week three. The goal in the first month isn’t to exhaust yourself but to build the habit of showing up.
If you genuinely can’t fit three sessions in a given week, two is fine. Research is clear that frequency matters less than total weekly volume when effort is consistent. Two solid sessions beat three rushed ones.
How to Use Resistance Bands Safely — and When to Ask for Help
Resistance band training carries a lower injury risk than most forms of exercise. A safety analysis of data from more than 38,000 participants, referenced in the 2026 ACSM Position Stand, found that resistance training does not significantly increase serious adverse events even in people with cardiovascular conditions, when implemented progressively.
That said, there are a few things worth checking before every session:
- Inspect the band before use. Run your fingers along the full length and look for nicks, cracks, thin spots, or discoloration. A snapping band doesn’t just end your session but can cause injury. Replace any band that shows wear immediately.
- Check your anchor point. If you’re using a door anchor, ensure the door closes fully toward you so the band pulls the anchor into the frame, not away from it. Test it with a gentle tug before loading it fully.
- Never release a stretched band suddenly. Always return to the start position under control. Releasing tension abruptly risks both injury and band damage.
- Match the band resistance to your current strength. An overly heavy band forces compensation which you’ll arch your back, recruit the wrong muscles, or cut the range of motion short. All three outcomes slow progress and raise injury risk.
When to seek professional input before starting: If you’re managing a diagnosed cardiovascular condition, have had a joint replacement or recent orthopedic surgery, are pregnant or recently postpartum, or have been physically inactive for more than two years with an existing health condition, speak to your GP or a physiotherapist before beginning a resistance training programme. This isn’t a barrier; it’s a practical starting point. Most health professionals will actively encourage you to train. They just want to help you do it safely for your specific situation.
If you experience sharp joint pain (not muscle fatigue but actual joint pain), dizziness, chest tightness, or unusual shortness of breath during any session, stop and seek medical advice before resuming.
Frequently Asked Questions
Can resistance bands actually build muscle?
Yes, provided you apply progressive overload consistently. A 2019 meta-analysis in SAGE Open Medicine (Lopes et al.) found no statistically significant difference in muscular strength gains between elastic resistance training and conventional resistance training with weights. The key condition is effort: the last few reps of each set need to be genuinely challenging. If they’re not, the stimulus for adaptation isn’t there regardless of what tool you’re using.
What resistance band should a complete beginner start with?
Start with a light resistance band, typically red or pink in most color-coding systems, offering roughly 6–10 kg of resistance. You should be able to complete 10–12 reps with clean form, with the last 2–3 reps feeling effortful. Many beginners underestimate how hard a light band can be when the exercise is performed slowly and with full range of motion. Get a set of three mini loop bands (light, medium, heavy) and one long loop band, and you’ll have everything needed for months of training.
How many times a week should a beginner train with resistance bands?
Two to three sessions per week is the evidence-supported starting point. The 2026 ACSM Position Stand on resistance training, drawing on 137 systematic reviews which confirms that training all major muscle groups at least twice per week is the minimum effective frequency for meaningful strength gains. Three sessions produces slightly better outcomes for most beginners, particularly for muscle growth. Always leave at least one rest day between sessions targeting the same muscle groups.
How long before you see results from resistance band training?
Most people notice improved strength and endurance within 4–6 weeks of consistent training, meaning they can do more reps, use a heavier band, or complete exercises that felt impossible at the start. Visible muscle changes typically take 8–12 weeks, and only with sufficient protein intake alongside training. Early gains (weeks 1–4) are largely neurological: your nervous system gets better at recruiting the muscles you’re targeting, even before significant muscle tissue growth occurs. That’s why the first few weeks sometimes feel deceptively easy before the real work begins.
Are resistance bands safe for older adults and seniors?
Yes, elastic resistance training is widely used in falls prevention and rehabilitation programmes for older adults, and the evidence strongly supports it. A systematic review by Yeun (2017) found that resistance band exercise significantly improved both balance and flexibility in community-dwelling older adults. Seated versions of most exercises are just as effective and remove the balance demand entirely. Starting with extra-light resistance and prioritizing hip abduction, seated rows, and ankle work targets the muscle groups most associated with functional independence. If you’re over 65 or managing a chronic condition, a brief check-in with your GP before starting is always worthwhile.
Do resistance bands help with weight loss?
Resistance training including band training supports body composition changes, but not primarily by burning calories during the session itself. The benefit works differently: building muscle increases your resting metabolic rate, meaning your body burns more calories over the course of each day. A 2022 Frontiers in Physiology meta-analysis found resistance band training improved body fat percentage in overweight adults more effectively than other forms of resistance training. That said, training alone rarely drives significant weight loss without dietary changes. The two work together not as replacements for each other.
Can I do a full body workout with just one resistance band?
Yes, one long loop band is genuinely enough to train every major muscle group. You can squat it, row it, curl it, press it overhead, and use it for core work like the pallof press. The limitation is that one band offers one fixed resistance level, so some exercises will feel too easy while others feel too hard. That’s why a set of three mini loop bands is worth the investment early on because it gives you the flexibility to match the resistance to the exercise rather than compromising form to compensate.
Here’s a detailed guide on home workouts
Conclusion
Getting started with resistance band training doesn’t require a gym, expensive equipment, or a complicated programme. It requires a band, a clear space, and the willingness to apply a little consistent effort twice a week. The science backs it that the 2026 ACSM Position Stand, the most comprehensive evidence base on resistance training ever assembled, confirms that elastic bands produce real, meaningful gains in strength and muscle when used consistently.
The two things that will determine your results more than anything else: progressing the challenge over time (don’t use the same band at the same tension forever), and staying honest about effort in the final reps of each set. Everything else like the specific exercises, the exact schedule, the brand of band matters far less than those two principles.
If you’ve spent years telling yourself you’ll “get fit properly when you have more time or money or space,” this is what doing it properly actually looks like. A loop of rubber, a cleared patch of floor, and a decision to keep showing up.
References
- Lopes, J. S. S., Machado, A. F., Micheletti, J. K., de Almeida, A. C., Cavina, A. P., & Pastre, C. M. (2019). Effects of training with elastic resistance versus conventional resistance on muscular strength: A systematic review and meta-analysis. SAGE Open Medicine, 7. https://doi.org/10.1177/2050312119831116
- Currier, B. S., et al. (2026). Resistance Training Prescription for Muscle Function, Hypertrophy, and Physical Performance in Healthy Adults: An Overview of Reviews. Medicine & Science in Sports & Exercise (ACSM Position Stand). https://acsm.org/resistance-training-guidelines-update-2026/
- Yeun, Y. R. (2017). Effectiveness of resistance exercise using elastic bands on flexibility and balance among the elderly people living in the community: A systematic review and meta-analysis. Journal of Physical Therapy Science, 29(11), 1995–1998.
- Frontiers in Physiology. (2022). Comparative effects of resistance training types on body composition in overweight and obese adults: A meta-analysis. Frontiers in Physiology, 13. https://doi.org/10.3389/fphys.2022.863037
- Phillips, S. M. (2026). ACSM Resistance Training Guidelines press statement. McMaster University / American College of Sports Medicine. https://acsm.org/resistance-training-guidelines-update-2026/

Nick Smoot is a certified fitness coach and the founder of Smoot Fitness, established in 2012. With over a decade of hands-on experience, Nick has personally coached more than 400 clients both in person and online helping them achieve lasting, life-changing physical transformations.
As a contributing expert at Sportiemade (sportiemade.com), Nick brings real-world expertise and a no-nonsense approach to fitness. His coaching philosophy goes beyond short-term results: he equips every client with the knowledge, habits, and mindset needed to get into the best shape of their life and stay there permanently.
Nick specialises in strength training, endurance performance, and the mental discipline that ties them together. His signature philosophy? Lift heavy, run far, and never stop learning.
Whether you are just beginning your fitness journey or looking to break through a plateau, Nick's evidence-based methods and proven track record make him one of the most trusted voices in the fitness space.