A one-mat workout can help you plan familiar movements in a bedroom with limited clear floor space. Knees, elbows and feet can extend beyond its edges. You also need room to change position without catching a bedside table or pulling on furniture.
This one-mat bedroom workout uses movements that stay in one place. Its 15-minute clock includes warm-up, recovery and floor transitions. It is an illustrative beginner plan for adults who can move comfortably between standing and the floor, not a rehabilitation protocol or a complete strength programme.
Plan your one-mat workout within the cleared area
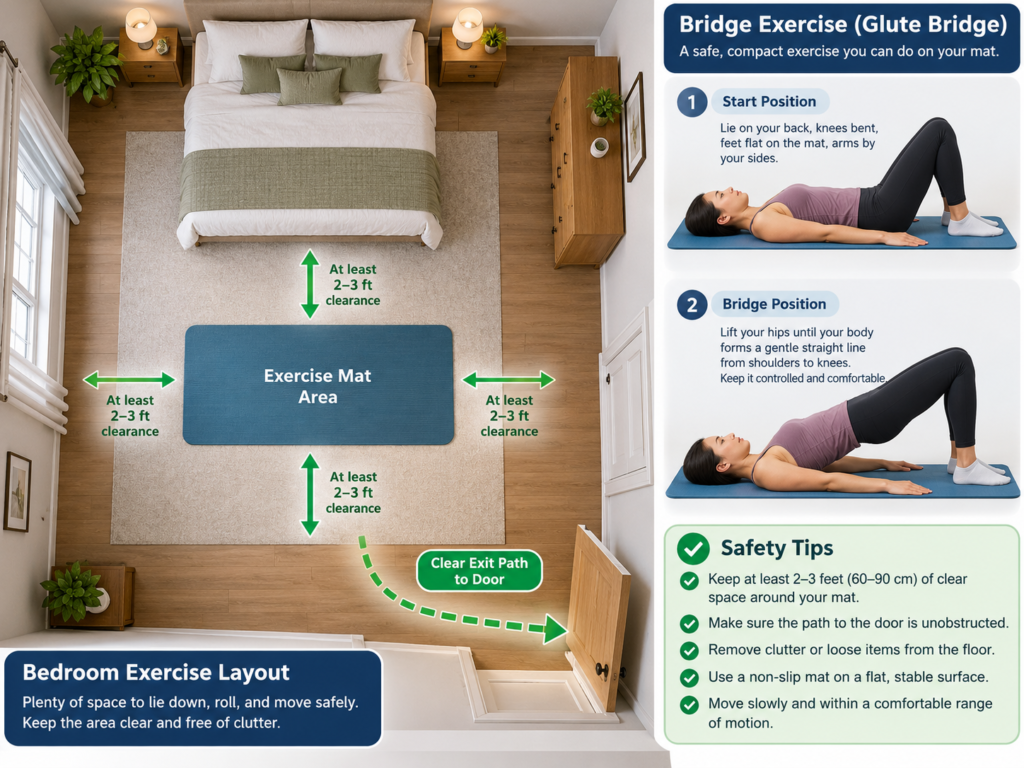
Lay the mat flat on a clean, dry surface. Remove charging cables, shoes and loose items rather than nudging them beneath the bed. Put the phone where you can hear the timer and still reach it after sitting down. Keep the exit clear and make sure pets cannot suddenly enter the working area.
Then rehearse the positions without exercising hard. Stand with feet hip-width apart. Bend a little at the hips and knees. Lie down with knees bent and feet flat. Roll onto your side and return to sitting. If using the hands-and-knees movement below, check that both your toes and the forward-reaching hand have free space.
| Clearance check | Pass condition | What to change if it fails |
|---|---|---|
| Standing reach | Arms move comfortably without touching lights or furniture | Keep arms low; omit overhead movement |
| Hip movement | Hips can move back without meeting the bed or a sharp edge | Turn the mat or omit the hinge |
| Lying position | Head, shoulders and feet have secure support | Move elsewhere if the usable floor is too short |
| Floor transition | You can sit and stand without grabbing movable furniture | Use a standing session instead |
| Hands and knees | Hands, knees and moving limbs remain clear | Use the supine option in its place |
| Mat stability | No sliding, bunching or curled edge during rehearsal | Fix the setup before starting |
There is no universal mat dimension that settles these checks. Your height, reach and movements determine the usable footprint. If a safe rehearsal cannot fit, the space is too small for that exercise today. Sportiemade’s small-space fitness guide gives broader ideas; use the checks here before choosing which ones belong in your bedroom.
A 15-minute example with transitions included
Each strength interval is an opportunity for a few controlled repetitions, not a demand to keep moving until the timer sounds. Rest early if needed. The six one-minute strength blocks include 40 seconds allocated to work and 20 seconds allocated to recovery.
| Clock | Activity | How to use the time |
|---|---|---|
| 0:00–2:00 | Easy march | Small steps, arms low; begin very gently |
| 2:00–3:00 | Heel digs | Alternate short forward touches |
| 3:00–4:00 | Easy march | Gradually settle into a comfortable rhythm |
| 4:00–5:00 | Floor transition and rest | Sit, roll down carefully and set feet flat |
| 5:00–6:00 | Glute bridge | Up to 40 seconds of controlled reps; 20 seconds rest |
| 6:00–7:00 | Supine heel slide | Up to 40 seconds alternating; 20 seconds rest |
| 7:00–8:00 | Glute bridge | Repeat only if still comfortable; 20 seconds rest |
| 8:00–9:00 | Transition and rest | Roll to the side and move onto hands and knees |
| 9:00–10:00 | Single-limb bird-dog preparation | Up to 40 seconds; 20 seconds rest |
| 10:00–11:00 | Single-limb bird-dog preparation | Alternate carefully; 20 seconds rest |
| 11:00–12:00 | Supine heel slide | Use the first part of the 40 seconds to roll down; then move; 20 seconds rest |
| 12:00–13:00 | Return to standing and rest | Rise through your usual comfortable method |
| 13:00–15:00 | Easy march, slowing gradually | Let breathing settle; continue longer if necessary |
Total: 240 seconds warming up + 180 seconds in dedicated transitions + 360 seconds in six work/recovery blocks + 120 seconds easing down = 900 seconds, or 15 minutes. The extra roll-down at 11:00 is inside that block’s 40-second allocation. Take additional time whenever a transition needs it; safety takes priority over preserving the advertised elapsed time.
Get the floor movements comfortable
Glute bridge: lie on your back with knees bent, feet hip-width apart and arms resting beside you. Exhale as you lift the hips a small, controlled amount; inhale as you lower. Avoid pushing up so far that your lower back arches. Try five slow repetitions and use the remaining work time to rest. Make it easier with a smaller lift. ACE’s bridge instructions emphasise controlled movement and avoiding excessive back extension.
Supine heel slide: stay on your back, knees bent and both feet on the mat. Slowly slide one heel a short distance away, then bring it back. Alternate sides while keeping the torso quiet and breathing freely. Start with three slides per side. Reduce the distance if you feel your back position changing or the foot approaches the mat edge. This is a simple original control drill in the example, not a clinical treatment.
Single-limb bird-dog preparation: place hands beneath shoulders and knees beneath hips. Begin by sliding one leg back with toes staying down, then return it; change sides. If comfortable and clear of furniture, try a small lift of one hand instead, keeping the other three contact points planted. Aim for three repetitions per side, moving slowly. This deliberately stops short of the full opposite-arm-and-leg movement described in ACE’s bird-dog guide. Its central cue still applies: use only the range you can control without sagging or twisting.
If wrists, knees or getting onto all fours are uncomfortable, remain supine and repeat short heel slides during those two blocks. If floor work itself is unsuitable, choose a standing routine elsewhere rather than treating the bed as an alternative floor.
Work around the room without using furniture as equipment
A low ceiling need not matter for these floor exercises, and marching can use low arm swings. A bedside table is different: its corner remains a hazard even if you intend to move carefully. Remove it or select another area when your body could reach it during a normal transition.
Do not use a mattress for bridges, bed-frame pulling or balance support in this plan. There are no under-bed anchors, table rows or chair step-ups. The only support surfaces are the floor and mat. The mat should remain stable; manufacturer Manduka notes that grip depends on factors including moisture and the surface, so a mat’s presence alone does not establish secure footing. Follow your own mat’s care instructions.
Stop an exercise for pain, pins and needles, unexpected weakness or loss of balance. Stop the session for dizziness, chest discomfort or unusual breathlessness and seek appropriate help. A cramped space is a reason to simplify, not to hold your breath and force a position.
Progress without expanding the footprint
Repeat the same version on another day before adding difficulty. Log bridge repetitions, heel-slide distance using a mark on the mat, which bird-dog preparation you used, and any extra transition time. Keep those conditions consistent enough to compare.
You could next add one controlled repetition while retaining the rest, or make a heel slide slightly longer within available clearance. Change one thing. Do not reduce all recovery and add full limb reaches at once. If the longer movement leaves the safe footprint, it is not the right progression for this room.
Frequently asked questions
How much clear space do I need?
Enough for your entire moving body and unhurried transitions, not merely the rectangular mat. Use the footprint checklist. If lying down or rolling meets furniture, relocate the workout.
What if my room has a low ceiling?
Keep standing arm movements below the obstruction and use the floor options if they fit. Check fans and pendant lights during rehearsal. A ceiling restriction does not justify squeezing beside sharp furniture.
Can I use my bed as workout equipment?
This plan does not require it. A mattress, movable frame or bed edge provides a different setup with uncertain stability. Use the mat and floor, and select another format if safe floor transitions are unavailable.
Leave the mat area clear enough to reproduce next time. The best improvement may be a smoother setup and less hurried position changes before any harder exercise is added.
Sources
Movement references: ACE glute bridge and ACE bird dog. The footprint checks and timed sequence are original examples.

Nick Smoot is a certified fitness coach and the founder of Smoot Fitness, established in 2012. With over a decade of hands-on experience, Nick has personally coached more than 400 clients both in person and online helping them achieve lasting, life-changing physical transformations.
As a contributing expert at Sportiemade (sportiemade.com), Nick brings real-world expertise and a no-nonsense approach to fitness. His coaching philosophy goes beyond short-term results: he equips every client with the knowledge, habits, and mindset needed to get into the best shape of their life and stay there permanently.
Nick specialises in strength training, endurance performance, and the mental discipline that ties them together. His signature philosophy? Lift heavy, run far, and never stop learning.
Whether you are just beginning your fitness journey or looking to break through a plateau, Nick's evidence-based methods and proven track record make him one of the most trusted voices in the fitness space.